Wednesday, April 24, 2013

Quilting and Kimono

Aaaand I'm quilting again this week! Adding more squares and tacking down those patches! :)


I'm really enjoying working on my quilt again! I've got a friend who just announced she's got a little one on the way! I was going to crochet her a blankie but what the heck, I'll try my hand at some real quilting (even if it's on a small scale!) I also actually have a baby blanket at home that's almost done being crocheted, all I need to do is attach the squares so that is also a possible gift :)

I'm also still working on those three juban - I finally have all of the material cut and I've sewn Liara's silk slees shut by hand. Everything else is machine work.


Anyway, that's my week in a nutshell! Next post will be a birthday post!

Monday, April 22, 2013

Hello, all! I've been home sick this last week so I haven't been up to much. But here's just an overview:

I made some pot pies. I thought at most I'd make two - I ended up making three, and barely having enough crust to get by!


I also dyed and ironed some more fabric for another two jubans, one for me and one for my sister. All of the other pieces are cut! and I decided to put some interfacing in those collars too.


Lastly I've dragged out an old project - my cathedral window quilt. I've been working on it off and on since I left for college, so it's been about... eight years in progress. Admittedly, I've gone entire years without picking it up. It's intimidating... it's wide enough to be king size and though I only have three 'rows' that's still well over 150 white squares and I don't know how many patches of colored cloth in the windows.


Have a good week everyone!

Monday, April 15, 2013

Here I am at the event! It ended up being really fun despite my migraine!

Thursday, April 11, 2013

Juban

(measurements include seam allowance)

Pattern for L size (I have a 43" waist and am a D cup. The juban in the pictures is an inch smaller widthwise and 3.5" shorter. I have included modifications for a better fit in this tutorial):

body: 27" wide x 32" long rectangle, cut on fold with top of juban on fold (total measurement of juban body is 27" x 64").

Collar mating surface is cut as follows:
a) From the center, measure 2.75" in each direction at the top. Mark.
b) from the center at the bottom, measure 1/2" in each direction. Mark.

c) Mark two diagonal lines connecting each marking (top and bottom) on thier respective sides.
d) Cut along markings, cutting the back of the collar right on the fold.

collar: 7" wide and 64"long

sleeve: 15" wide and 42" long cutfoldfind

Loop part that goes down back:
4" wide and 28" long


Step 1: press collar in half, press seam allowances on sleeves.

Step 2: serge around all edges except sleeves.

Step 3: press all remaining seam allowances to be rolled except collar seam allowance on body of juban - collar will not be rolled.

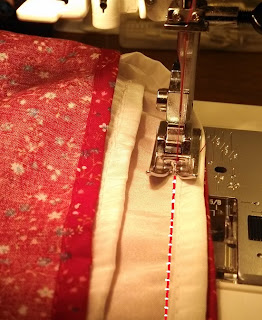
Step 4: machine stitch the lower seam on the sleeves as follows.
a) stitch wrong sides together, making a 1/4" seam.
b) turn sleeve inside out and stitch with right sides together, just beyond the edge of the seam that is now sandwiched in between right sides. leave enough so that when the seam is pressed, a small overhang hides the first seam (about 1mm on either side).
c) turn inside out again.


Step 5: hand stitch 1/4" rolled hems on sleeve edges. Blindstitch is preferable, I recommend pressing the seam allowances before stitching to ensure uniform seams and a pretty stitch - this part of the juban is the most visible.

Step 6: sew the adjustment panel. 1/4" hems (rolled or not, it's your preference) up the sides, then fold in half and stitch across every 3", backstitching at either end for reinforcement.


Step 7: Pin the collar in place. the shape of the collar does not come from the way the body of the juban is cut, rather from how you apply the collar. Make sure there are as few wrinkles as possible at the 'corners' of the collar. the collar should be sandwiching the fabric that forms the body of the juban like this:
  |    |    |
  |/  |   \|

the diagonals represent the seam allowances that are pressed inwards. Your seam should pierce all five layers, two collar layers, seam allowances, and juban. Approx. 1/2" worth of juban will be extending into the collar. Take care not to twist the collar. Accurate and careful placement of pins is important to this process.


Step 8: Pin the adjustment panel in the center of the back between the outer layer of the collar and the juban.ensure that it is perpendicular to the collar.

Step 9: Sew the collar and the adjustment panel on.

Step 10: Hem all edges of the body of the juban. I use 1/4" rolled hems all around.


Step 11: Sew the sides of the juban closed, right sides together. Sew beginning approximately 10" down the sides of the juban, leaving an additional 2" open at the bottom for looks. This will leave an opening for your arm and a place to attach our sleeve. Reinforce all seams by backstitching.


Step 12: Attach sleeves as follows: 
a) turn juban inside out. 
b) with sleeves right side out, tuck the sleeve into the juban. 
c) match the center tops at the shoulders. 
d) stitch together just inside seam allowances 8" in each direction (for a total of 16" of stitching on each sleeve), either by hand or by machine. If using the machine for this step, ensure that the proper tension and needle has been selected for your fabric to avoid puckering/running/fraying.


Step 13: Tack outside edges of sleeves closed with a 1/4" long horizontal stitch, 10" down from the top center of the sleeve, using the same color thread as your sleeve. Backstitch.


There you have it! Your very own juban! An experienced seamstress can whip one of these out in less than five hours!
If you would like more detailed pictures of any part just let me know - I still need to make two more of these so I'll be happy to take pictures for clarification if anyone needs them!

Wednesday, April 10, 2013

Today I made...

Today I made a nagajuban! I don't have another haneri so we are looking at a very floppy collar, but once i get the haneri and an eri shin in there it'll be even more awesome!

 
I am very tired... lol sorry.


The sleeves are supposed to be tacked together with a few stitches ten inches down the side, but I forgot. I will tack them down soon, just not right now xP


I didn't adjust the tension properly on the sleeves - in fact next time I will hem them by hand so that they are smooth and pretty. I'll try to press out the wrinkles, but I'm fairly sure it's a tension issue. Again, this was a test run, it just came out way better than I thought it would! I'll post a tutorial soon, but I wanted to show off now. :D
 
Laters!

Monday, April 8, 2013

My sister-in-law and I spent the weekend working on an original character cosplay idea for a Sci-Fi event at the Bear Space Collective. Initially we were going to cosplay Hyatt and Excel from the anime Excel Saga:

 
But then we decided we didn't want to do anything revealing and/or skintight, so we sat around thinking for awhile. I saw this lame show on TV at work the other day, and it inspired my cosplay idea because although the show was lame, the woman in it had on this great triangular dress. It was one of those 60's space flicks, and it was just... cheesy and funny and dumb all at once. I told my sis-in-law (going to call her Liara from here on out - that makes it a lot easier! xD) about it and the idea took off; she designed two original characters for our cosplay:


We headed to Joann's in search of the right fabric and notions. Liara knew she had some fabric at home she wanted to use for her costume (some stiff silver stuff), but there were several remnants of clear vynil at Joann's so we picked those up as well as some shiny silver metallic zippers and some big buttons that we painted with metallic tempera paint. I happened to have about a yard and a half of high-quality black vinyl (the soft stuff for upholstery lying around), leftovers from our Mass Effect cosplay. She's also got these fantastic silver boots too lol - we call them 'moon boots'! For my costume I found the best polka dotted fabric - I love it!


We nabbed one of those Sew n' Save patterns for $2.99 for some girls' sack dresses, and with a few inches added on here and there, we were ready to go! I ran to walleyworld the next day and got a hula hoop and we sewed it in:


Was a chore getting the hula hoop in under the foot - actually I had to take the foot and its assembly off completely! And then afterwards... the machine decided that now that the hula hoop was in there it was suddenly going to cooperate LOL. While Liara was helping me sew up the collar, I started work on the oven mitts and the boot covers. I had some Hello Kitty houseshoe boot things and there was this great silver pleather... I kept thinking Geri Spice the whole time!


Semi-finished project!


Still not done, but well on my way! I've only got the helmet to go and the arms - if I can afford to do them :D (Also sorry I'm wearing a shirt under my dress - we worked late into the night as usual and I wasn't about to do a whole dress rehearsal!)
 
On a kimono-related note I got two things in the mail from Rakuten a couple days ago: a set of two kimono 'crips' and two new date-jime! I love Rakuten because there are so many deals there - the date-jime were less than $10 apiece! 2 for the price of 1!


Thanks for reading, see you soon!

Friday, April 5, 2013

Kimono

For my 26th birthday I decided to have a Japanese-themed party :D We are going to eat sushi and wear kimono... then we will probably go out on the town! I'm going to have a Hokusai-themed cake (buttercream transfer, you just wait, there will be pictures!). (Check out this buttercream transfer I did for my brother-in-law's birthday sorry the waxpaper is still on I don't have any pictures of it on the cake:
Isn't it cool?)

I bought lots of accessories and several kimono for myself and my sister, sister-in-law and (surprise!) another friend. Total? I've dropped about $1,200 on this project... I feel that it's well worth it though. It's been one of my lifelong dreams/goals to own a real silk Japanese kimono. I fear I am addicted now though xD my husband said I can buy an outfit a year from here on out - we shall see. My trouble is that I have absolutely nowhere to wear my kimono! There is a Sakura Matsuri once a year in Santa Fe, and that's about it! I don't think I'm brave enough to do 'kimono days' like some of the gals on IG are doing... maybe if I had someone to do it with but otherwise - eek! Also, it's a desert here, and I don't have any hitoe so it will be a very hot day for me if I have to wear my kimono during the summer :O

Here are some pictures of the kimono I bought.

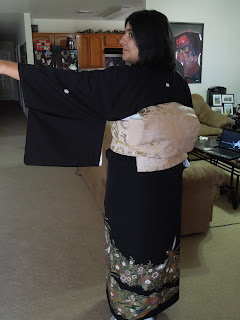
This is my kurotomesode. I have always wanted one of these, and I picked it up for $250 at Ichiroya, but now that I have it I realize I will never get to wear it anywhere after my birthday... oh well, lol its so beautiful I don't care! (forgive the horrid kitsuke, I just started doing this and honestly, this was my first time wearing it! It has a hiyoku, I just didn't know that it was supposed to show... No obiage at the time, no obijime, no obi makura, and first otaiko ever! Also, that isn't my obi - it's my sister-in-law's nagoya obi, so it doesn't go with the kimono.):


Here is the obi that actually goes with the kimono:
 
 
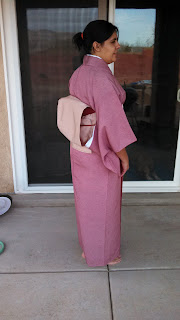
I also bought myself an edo komon, dark red with white spots in a 'shark skin' pattern (?) I got it from Kimonoya (couldn't help myself!). This is the one that the friend who couldn't get a kimono can wear if she wants to... (Again, bad kitsuke, gomen, ne!)


Here is my sister's kimono:


My sister-in-law is good at avoiding pictures! But here is a picture of her kimono:


When I got it there were some horrid stains around the collar - it's quite old so I guess that was to be expected... but I went into a mexican cleaning frenzy and decided to wash it o_O I'm lucky only the thread and lining shrunk - I lost almost three inches off of that kimono! good thing my sister-in-law is a little shorter than I, she will just have to go without ohashori... :(

Lastly, here are some pictures of all my accessories and epic loots:


I thought that folding koshihimo like this was so cute! You can see how to fold little pentagons here: http://www.immortalgeisha.com/ig_bb/viewtopic.php?f=18&t=9815

Anyway, that's the end! See you next time!